
Figuring out a 5×12″ hoop
Fri, 30 Aug 2019
Update: there’s a tutorial now.
One of the first things I bought for my machine was a set of four Embroidex hoops 📦. The Brother PE-800 comes with a single 5×7 hoop, which is enough to get by, but 4×4 uses up less stabilizer and, it later turned out, having a second 5×7 was useful for mass-producing. If you’re gonna do a design with forty-leven color changes, might as well sew at least two.
The other two hoops are a tiny one for pocket designs, and a 5×12″ monster with three attachment points. When I made the solid-color crowntail dragon, I sewed its wing piece in two hoopings because alignment (other than front-to-back) wasn’t that critical. But it would be really nice, with the extremely festive pre-printed ones, if I could carefully align it once, nail it down, and stitch it out. It was time to figure out that 12″ hoop.
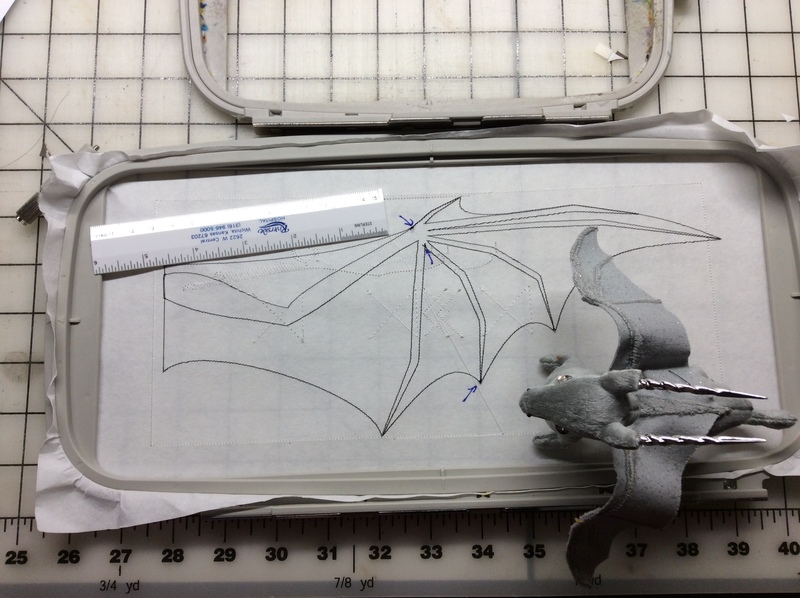
If you look closely at that picture, you can see a bunch of white thread. That was a bunch of trial patterns wherein I confirmed that the attachment points are 6cm apart. Very good: the next step was to break my design up into two pieces that each fit in a 5×7″ stitching area, and move one 12cm onto the other (to the left, in the case of that wing).
The attachment points are in the bottom of the picture above, and the little arrows show where the two designs meet. The lower one, which ends up on the left when the thing is in the machine, was a perfect match. The upper two overlapped by an extra stitch. The larger hoop can distort more easily, so that may be what’s happening here. If it’s consistent, I may be able to find a rotation that corrects for it.
So, you may wonder, how does one take an existing pattern and split it up? Welllllll… I’m told commercial software can do it, but I don’t know which one or how. With Ink/Stitch, it’s a manual process, but it works on imported designs as well as native ones. Import the file if you’re not using your own SVG, find a natural break point, break the node and the path. Rinse and repeat for each run of thread until you have a piece that fits in your 5×7 hoop. Then take the rest of it and move it 12cm down or sideways (depending on the orientation of your design). Done!
Okay, not always that simple. If your color changes overlap, you might need to interleave the two designs, and switch mounting points to do all of one color, then all of the next. Not fun. Putting each run of each color on a different layer may help with organizing them, although you’ll have to remember to insert a stop (or a mock color change) between the two halves of the color so you have time to shift the hoop.
It’s going to take some more experimentation to figure out the most efficient way to do this, so stay tuned.
Comments are not available.
📦: Technically, that's an affiliate link. I recommend showrooming on Amazon and buying somewhere else though.