The Wacky Chicken
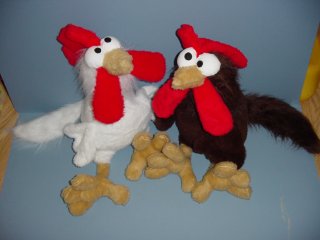

I had a request to revive a pattern from an older version of the blog: the Wacky Chicken (and variants Silly Goose and Wild Turkey). Please excuse the size of the preview – camera resolution wasn’t great in 2003!
Despite my packrat habits, not a lot survived from that version somehow. There was another picture of the chickens with one flopped on its belly, and I thought there was at least one of Silly Goose but… maybe not?
“But wait, Karen,” you say, “chickens are not a mythological creature, and those are pretty cartoony. That seems way outside your wheelhouse.” Well, yes. Our then-church’s VBS theme that year was farm-related (county fair, maybe?), and our pastor wanted to have a capture-the-flag game, but with chickens. This was before the days when you could just go to a pet store and buy a highly detailed stuffed animal for your pet to destroy, so I set about sewing a couple.
They needed to have a lot of “grabby” bits, hence the prominent wings, tails, feet, combs, and wattles. I don’t remember having to re-sew anything during or after the game, so I guess I did an adequate job. At the end of the week, the chickens went in the fund-raiser auction.
I’ve simplified the feet here, because aside from the original feet everything is flat-sewn and simple. I’ll do those, and the goose and turkey variants, in a future post. I’ll also do a smaller version (these are large, ~20″ plushies but they scale down – or up! nicely).
I didn’t take process pictures back in the day because I made them in a hurry, but they’re fundamentally an easy thing to make: essentially two fused three-part spheres, with the tail and comb sewn into the back seam, and the wings sewn into the side seams.
Instructions
- 2/3 yd chicken-colored plush, minky, or fleece. Optional: cut tail feathers from matching shag fur instead.
- 1/3 yd yellow or gold plush, minky, or fleece.
- 1/3 yd red plush, minky, or fleece.
- Scrap white cotton for eyes (or large pompom)
- Scrap black felt, vinyl, or fray-checked cotton for pupils
- Fiberfill
- Optional: Beanbag for weight
Print, match up, and cut out all the pattern pieces. You can either cut them out on the black lines, or cut at the edge of the shaded area and add seam allowance back in later. Do the latter if you are re-sizing the pattern. The white seam allowance is 1/4″ if printed at full scale (US letter size; the inner rectangle is 8″ x 10 1/2″). Cut out fabric in the colors designated by the pattern.
Match right sides together (RST) and sew the wings, comb, wattles, beak, and feet. Clip inside curves, turn, and lightly stuff the toe tips, comb, and wattles. Stuff the beak more firmly. Leave the wings and tail feathers unstuffed.
Find the two body pieces with only one leg (the sides). Place and tack down the comb along the no-leg side of one side body piece – pin or tape the point of it out of the way so it doesn’t get caught in the seam later. (Optional: Leave the comb out now, and hand-sew it on later like the beak.) Place and tack down the tail feathers. Match the two body pieces RST and sew the back seam, leaving an opening for turning.
Place and tack down a wing along the side of one side body piece. Beginning with the top point and matching it carefully, match the front body piece RST to this side body piece and sew all the way down to the leg opening. Then carefully match the bottom point, and sew up to the other side of the leg opening. Repeat for the other body side, making sure both wings are aligned the same way (or not – it *is* wacky).
Put the legs inside the body so the very tops match up with the open ends of the legs, and sew across each open end. Or wait and hand-sew the legs into the openings after turning the body – this will give you rounder legs, and you can stuff the entire leg if you prefer.
Clip all inside curves, turn, and evenly stuff the chicken. If you want it to sit up, stuff it a little more firmly, making sure the neck has sufficient support. Put a beanbag (a gathered circle of scrap fabric with polyester stuffing pellets inside) inside if you want. Ladder-stitch the back opening closed.
Decide where you want the face. I placed mine looking somewhat upwards, which means they can also flop on their bellies without face-planting. If you don’t want this, you’ll probably also want to place the comb somewhat further forward on the head, which means you can’t sew it into the seam.
Turn the edges of the beak, wattles, and comb (if it isn’t already sewn into the seam) inside and whip-stitch them closed. Position the comb and ladder-stitch it onto the head. Sew around it once with big stitches to fix it in place, then smaller stitches to make it neat.
Place the wattles so that their tops will be covered by the beak, and stitch in place. Place the beak and ladder-stitch in place.
Cut two circles of white fabric for the eyes. I like to make them two different sizes. The smallest should be at least 5″ in diameter. If you’re sewing the pupils on, do that now. Run a gathering stitch around the outside, place a blob of fiberfill in the middle, and gather the edges around it to make a little sphere. Ladder-stitch the eyes in place, touching the top of the beak and each other. If you didn’t already put the pupils on, do that.
That’s it! Take a picture of your wacky chicken and tag me on social media.