Converting a USB-drive embroidery machine to wifi
It’s possible to put an embroidery machine (or a 3d printer, a cutting machine, a TV, or almost anything else that reads from a USB stick) on your wifi network, and set it up so that all you have to do is copy your embroidery files into a special folder on your PC (Windows, Linux, and probably Mac though I don’t have one to test it with) and they’ll appear on your embroidery machine. Here’s what you’ll need.
December 2022 update: Not only are Raspberry Pi’s almost impossible to find, the company itself has been running around on social media setting fire to their corporate goodwill. I think they’re trying to be “edgy” but are falling short and landing on “we’re a bunch of jerks.” If you’ve got a Pi handy, do this, but don’t give the company your money. I’m trying out alternate single-board computers myself, and will have updates soonish.
A Raspberry Pi Zero W
The official Raspberry Pi site will tell you where you can buy a Pi, either mail-order or in person. In the US, if you live near a Micro Center, you can buy one. Literally, one. That’s all you can mail-order as well. This is probably good, because I’d buy half a dozen every time I was in a Micro Center because it’s so fun to set up a tiny computer. They’re ten bucks! Make sure you get the wireless one; that’s the whole point of the exercise.
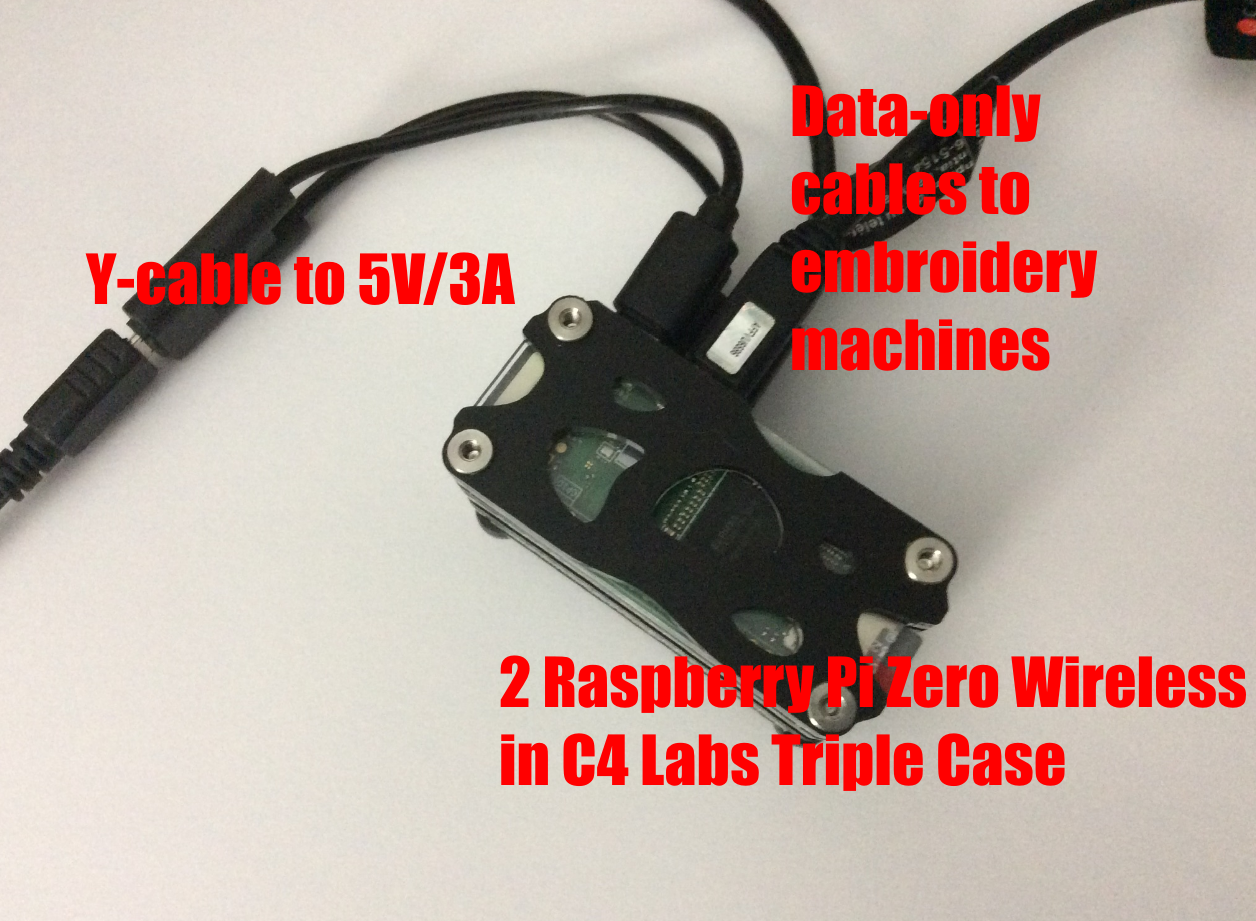
A case, maybe
You don’t want to poke the circuit board while the Pi is turned on (or other times, really, because static), so maybe get a little case for it. You can get cheap ones, you can get fancy ones. My first Pi lived in a piece of folded cardboard. The one in the picture is from C4 Labs, also sold in person at Micro Centers.
A Micro SD card
This is what the Pi uses for a “disk drive.” You don’t need a very big one; 16GB or 32GB will do. Get a good name brand. I usually go with SanDisk 📦, but depending on when you’re reading this, times may have changed.
A Micro SD card writer
If your computer doesn’t have one built in, USB ones are super-cheap 📦.
USB cables and power supply
The Pi has two USB-micro ports. One is for power, and the other is for data. You can power it from the data port, but that means your embroidery machine has to have enough power, and has to stay powered on.
Power is easy. Find a nice 5V power supply from an old cell phone. Make sure it is at least 2A.
Data is a little more complicated – if your embroidery machine supplies power to its USB port, you don’t want that getting to the Pi, or worse yet the Pi trying to supply power to the embroidery machine. So you either need to strip the jacket off part of a USB cable and clip the red wire, or you need to cover one connection with a scrap of electrical tape, or you need to put a power blocker 📦 in between the embroidery machine and the Pi. You’ll want to put an extension cable 📦 between there too, so you can put the Pi safely out of the way.

The first setup, with the Pi plugged directly into the side of the embroidery machine, looked neat but I pretty quickly figured out that the Pi was going to get bumped and possibly damage the embroidery machine’s port. It lives under the table now, but that’s not as photogenic. If you’re only hooking up one Pi, just get a 6″ USB cable, tape or cut the power line in it, and tape the Pi to the back of the embroidery machine or table. (Duct tape will hold in the heat though, so don’t get carried away.)
That’s it! If you’ve already got cables, can write SD cards, and have a nearby Micro Center, you can do this for under $25. If you have to go to Adafruit or somewhere mail-order, it’ll be a little more, but still not bad.
Tip your server
Okay, this is purely optional, but I do have a ko-fi (which is also where freebie designs first appear).
Toss a coin to your stitcher! (Ko-Fi)
Software
You’ll need a few more things, but they’re all free.
An SSH client
If your operating system doesn’t have one built in, you can use something like Termius. This is how you’re going to talk to the Pi since it doesn’t have its own keyboard and screen. It’ll open a window on your desktop PC instead.
An SD card imager
I use Etcher. There’s a version for Linux, Windows, and MacOS.
A Pi operating system
It’s available in this repository. Click on “usbgadget.img” and it should let you download just the image. It’s based on the 2021-05-07 Raspberry Pi OS Lite, but I’ll try to keep it current.
If you’d like to build your own image, check the bottom of the page for the behind-the-scenes.
Putting it all together
Flashing the OS
We’re going to unpack that image onto the SD card, in a format that the Pi will run off of. Put the SD card in the reader and open whichever imager you’ve chosen. Both work the same way: pick a device, pick what you want to put on it, push the button. With Etcher you’ll have to point it to the image you’ve downloaded, with Imager you’ll have to pick Lite. Both should find the card, though if you have other USB storage devices plugged in make sure you pick the right one. That’ll take awhile.
Once that’s done, your computer should recognize the SD card just like a thumb drive. It will have two partitions, boot and rootfs. Open boot. We’re going to tell the Pi the wifi password. Find the file named wpa_supplicant.conf. It will look something like this:
1
2
3
4
5
6
7
8
9
10
<pre class="wp-block-preformatted">country=US
ctrl_interface=DIR=/var/run/wpa_supplicant GROUP=netdev
update_config=1

network={
   ssid="WIFI_SSID"
   scan_ssid=1
   psk="WIFI_PASSWORD"
   key_mgmt=WPA-PSK
}
Put in your actual wifi ssid (the network name) and password, of course. Save that file, unmount the SD card, and take it out of the reader.
Wake up the Pi
Put the SD card in the slot on the end of the Pi, and connect it to power (the USB port closer to the end of the stick). It should light up, and in a moment or two if all goes well it will be on your wifi network. If you connect the other USB port to your embroidery machine, using the no-power cable, it should recognize it.
Connecting from a PC
Now you can press Windows+e to open the Windows explorer, type \\usbgadget. You should see the usb_share folder, and be able to read, write, and delete files to it. It’s open to your whole network, so be careful.
If you also want to mount it on a Linux machine, from that machine you just need to type:
1
<pre class="wp-block-preformatted">sudo mount -t cifs -o username=pi%guest,user=pi,uid=LOCALUSERNAME //XX.XX.XX.XXX/usb /mnt/usbgadget
(The mount point doesn’t have to be named with the Pi hostname if you have a different convention on your machine.)
That’s it! Your Pi is now a wireless USB stick!
Don’t forget to delete the usbgadget.img image off your PC if you downloaded it there. It takes up a lot of space and you won’t need it again.
Care and feeding of the USB gadget
Okay, that’s not entirely it. You’ll probably want to turn the Pi off at some point, and maybe you’ll want to change its name. And maybe you’ll want to get really fancy, since you now have a whole ‘nother computer sitting there (believe it or not), and let it do things like… do ad blocking for your whole network, or be an Internet radio station. Or maybe you and your embroidery machine tried to write to the virtual USB stick at the same time and now things are all confused. It’s all here.
If this works for you, let me know!
(If it doesn’t work for you, also let me know!)
Thanks to Russell Barnes of MagPi magazine, who wrote the watchdog script.