Sun Conure, 2006 version
This version is designed to be made from felt; it has an open bill, a jointed neck, and compromise wings. The cut-and-sew quarter version simplifies some of this and has full open (but much more accurately colored!) wings.
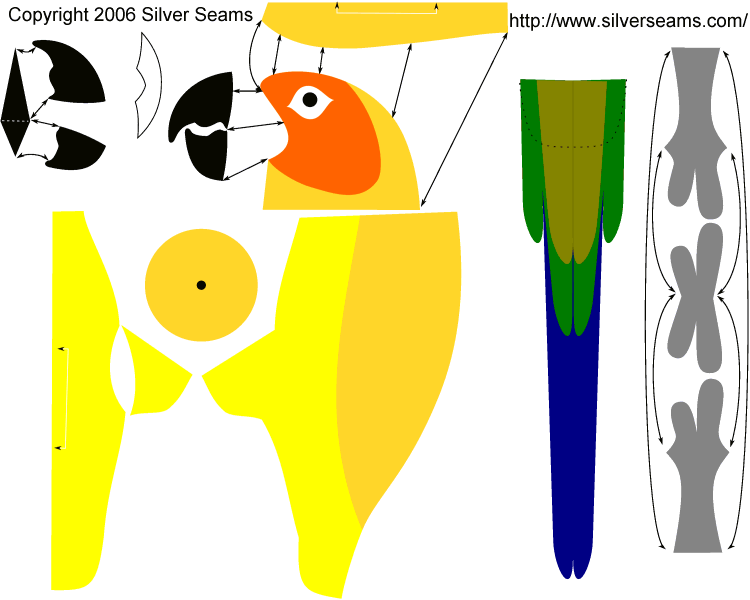
The 2006 Pattern
These patterns are 75dpi, for an 8×10 image size.
If you’re sewing felt, cut your pieces without a seam allowance; otherwise, add one appropriate to the fabric you’ve chosen (including between color changes). Some pattern pieces are shown with folds – double the pattern (or flip it after tracing one side instead of folding the felt.
The wings and tail will require stiffening. Either use a pre-stiffened felt such as Eazy-Felt, or make your own by saturating felt with thinned white glue.
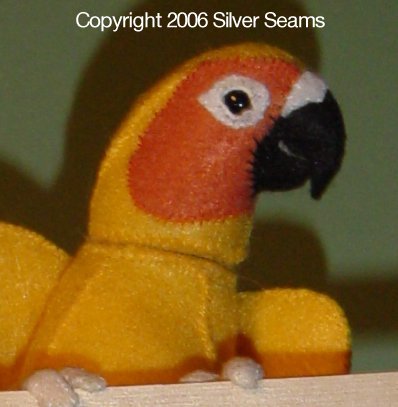
Head
Cut two of each of the bill pieces from black or charcoal. Cut one inner bill (the diamond shape), and one cere from off-white. Cut two eye patches from white – they will be appliqued onto the head side. Cut two head sides from orange and dark yellow, and piece the colors together. Cut one head gusset from dark yellow. Cut two neck circles from dark yellow.
If the open bill is too daunting, combine the patterns (the point of the lower bill will overlap the upper) and cut each side as one piece.
Sew the bill pieces together along the outside seams (just the simple curve). Insert the inner bill, beginning at the fold line and working to the tip of the bill each time.
Sew the head sides and gusset together, then insert the beak and sew it in place. If you’re using safety eyes, insert them now (remember, the eye patches will be added later). Stuff the bill and upper head carefully, making sure the beak is evenly stuffed and that the “forehead” is properly shaped.
Punch a hole in the circles for the joint hardware. Sew one circle onto the base of the head, halfway around and insert the upper half of a 1 1/2” doll or bear joint, then put the second circle on, followed by the other half of the joint, making sure the lower circle moves easily but not too loosely. Finish stuffing the head and make any final adjustments, and sew the rest of the upper circle on (adding stuffing as you go to keep the joint area well-shaped).
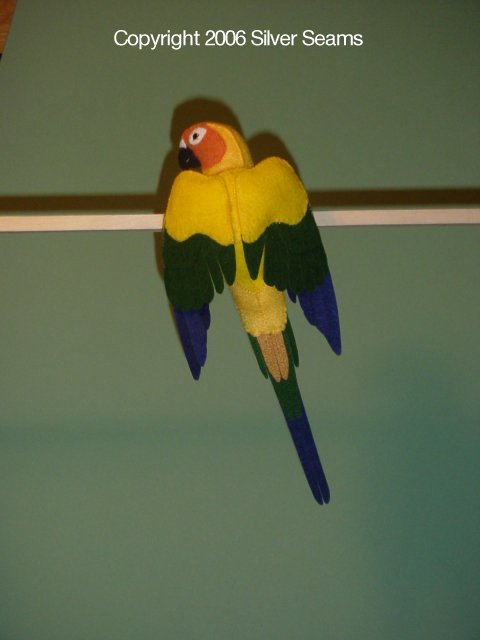
Wings
If I have my bird anatomy correct, the pattern pieces are marginal coverts (yellow), greater coverts (green), secondaries (green), primaries (blue), and more coverts (yellow) for the underside. Colors vary, and this is somewhat of a simplification – in particular, the primaries should be green on the underside, but it’s the terminology I’ll use.
Cut the primaries nearly to the top, then overlap them and stitch in place. Sew the yellow coverts together along the outside line. Insert a plastic doll joint through the underside piece, and finish sewing around the edge of the upper yellow coverts, through the green coverts and secondaries. This will leave part of the lower covert unsewn – position the blue primaries, and sew the lower covert, green secondaries, and blue primaries together along the outer edge, then sew the rest of the lower covert to the blue primaries (only).
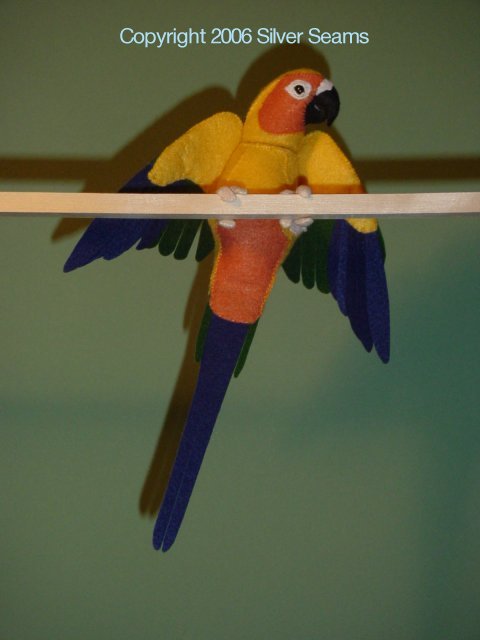
Body
Cut one underbody and two inner legs from light yellow, and piece two body sides from dark and light yellow.
Sew the legs to the underbody, then sew the two body sides together along the back line. Sew the underbody to the body top, leaving the ends of the legs open, the tail area open, and the neck open. Stuff the body loosely so the neck opening is opened up into a circle, and attach the head assembly by sewing the lower circle carefully into the neck opening. You may want to turn the head occasionally to make sure you haven’t caught it in your stitching.
Attach the wings to the body. When parallel, the wings should be about a quarter of an inch apart, and the wrist should come up past the neck joint.
Feet
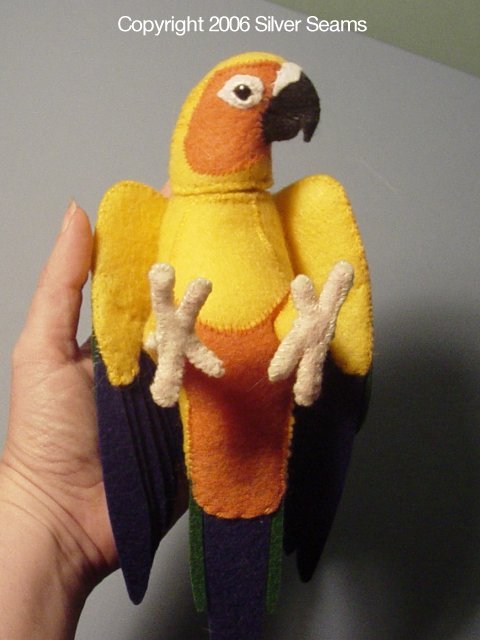
Cut two each of the front and back upper feet, and two feet bottoms, from light pink, gray, or cream felt.
Bend a piece of wire to make the feet, with the segment in between long enough to pass through the middle of the bird’s body stuffing and the toes close to the tips of the felt pattern (shorter toes on the inside), and insert it into the body (you’ll have to fold the toes together to slip them through the leg openings). Ideally, use galvanized or aluminum wire so it won’t rust through the felt, and make sure it’s stiff enough to hold the bird up. Don’t twist the wire together – you want support, not a spring! Wrap the wire with yarn and secure the ends with a bit of glue.
Sew the front and back upper feet together around the leg wire, just to the points on either side. Open the feet out flat, matching the toes to the wires, and sew the feet bottoms on.
Alternately, instead of sewing felt over the leg wires, wrap them a little more heavily with yarn, then sew the leg bottoms into the yarn at the foot tops.
Tail
Liberties have been taken, since most of the color changes are within single feathers. Cut two long central feathers from blue, layer four feathers in green, and two top feathers in olive green.
Finish stuffing the body, making sure the inter-leg wire is well supported, and sew the tail area closed, catching the tail feathers in the opening and making sure the long feathers stay properly aligned.
Finishing
Applique the cere to the top of the bill.
Sew on two round beads for eyes (if you haven’t used safety eyes). Cut an opening in the white eye patch smaller than the eye bead (start smaller than you think you’ll need, as the felt will stretch and you can always trim it later). Applique it over the eye, then sew the eyelids – a piece of white embroidery floss (all six strands) or Perle cotton in through the head (anywhere), out one corner of the eye, in through the other corner and back out through the head. Use white thread and a couching stitch to sew the floss down to the lower edge of the white eyepatch. Gently pull the ends of the floss and trim so the tails disappear into the head, then repeat for the upper eyelid. Repeat for the other eye, being sure the eyes are symmetrical.